So what’s the difference between loquat wine and loquat cider? Mostly it’s the amount of sugar added and the yeast used. From the perspective of home-brewing, this may be some of the easiest and simplest booze you’ve brewed. Take some loquat juice, add some sugar, add the yeast, let it sit for a while, and voilà!, you’ve got yourself some loquat wine. Fundamentally, it’s no different than any prison pruno.
But let’s drill down into some specifics. I’ll try to write this to it’ll be useful both to those with homebrew experience and those without.
Picking Loquats for Fermenting
You’re going to want the orangest, juiciest loquats you can find. Typically the riper the fruit is, the more sugars it will have and the less sour it will be. To a certain extent you can counter-balance the sour by adding more sugar, but that’s going to leave you with a heavier wine.
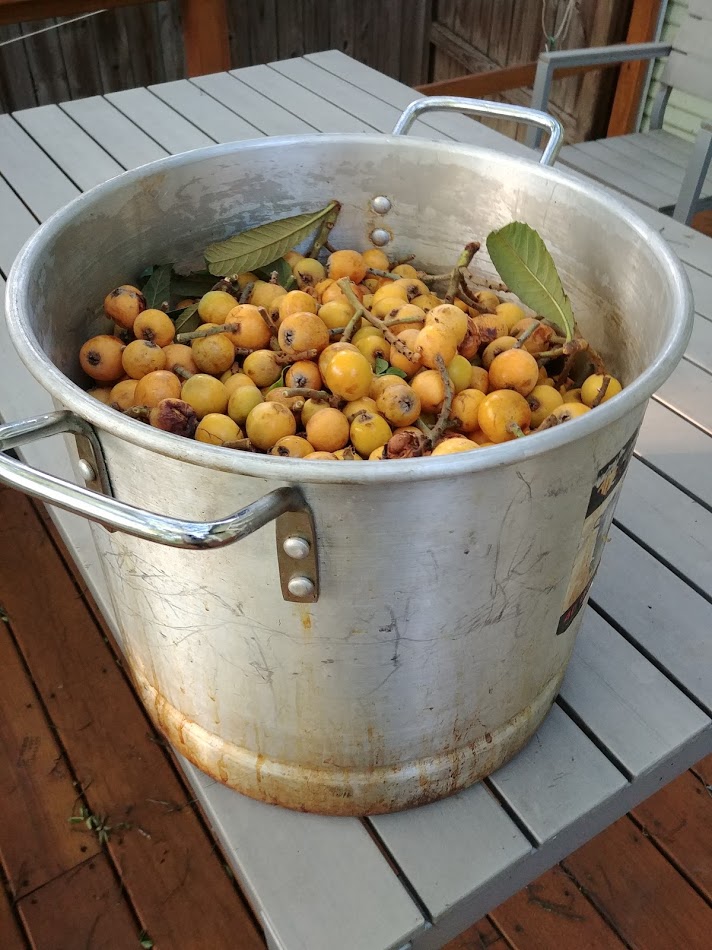
Second, pick a lot. For all the loquat recipes I’ve made, the wine is the hungriest for raw loquat-stock. For the batch of loquat wine in these pictures, I picked about eight and a half gallons of fruit, and I ended up with only a gallon and a half in my first-stage carboy. So that’s about 35 glasses of wine (5 fl.oz. per pour) for about two hours of work. If you’re doing a cider (12 fl.oz. per pour), that might only be 16 glasses. That’s why I typically buff up my batches with sugar to make them stretch across more servings.
Extracting the Juice from your Loquats
So, I’m no moneybags, but I tend to buy homebrew equipment piece by piece, as I get annoyed by doing it the hard way. Here’s the easy way of doing it if you’ve got the equipment.
- Run the loquats, stems and all, through a fruit crusher
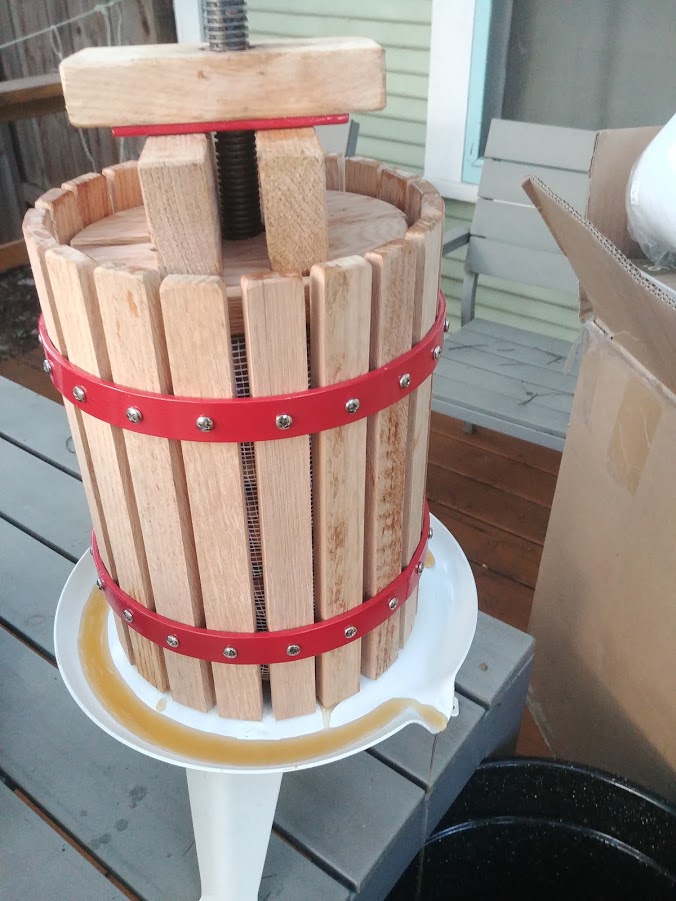
- Put the loquat pulp in a consumer grade wine/fruit press
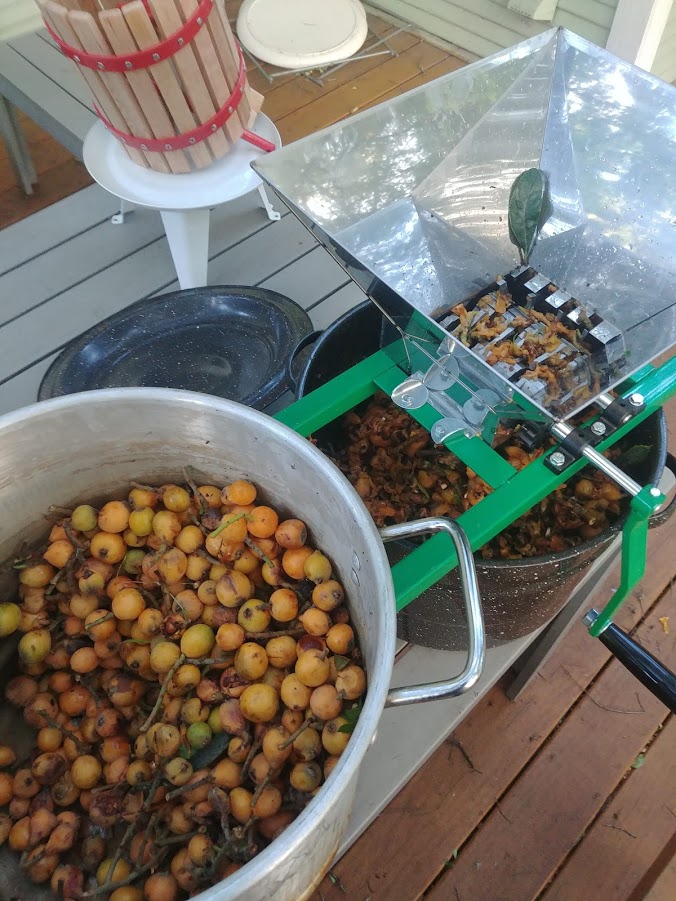
That’s pretty easy, and it takes only a few minutes to juice up an afternoon’s worth of picking. It’s fast enough that you don’t have to worry about the juice browning in the air. It will run you about $150 to get to that point though.
The Hard Way to Extract Juice
Here’s some other techniques we’ve used over the years.
- de-seed the loquats by hand.
- put them through a blender
- squeeze the loquat slurry through a cheese-cloth
That takes over an hour to do, sometimes longer, which can cause browning. If you do this, you could try dredging the loquats in white sugar as you go to keep their color. You’re going to be adding sugar later anyways, so it won’t affect the finished product.
We’ve also used a sauce strainer with mixed results. This might be a better choice for jellies, because it lets more of the pulp through than the wine press. And it also spits out the skins in a weirdly dry excretion, which you might be able to use for something else, like a bread maybe, but I haven’t gone down that route yet. But mostly the sauce strainer just jams up, which is hugely annoying.
Another option which is feasible, but I’ve not tried, is putting the loquats in a bucket or steel pot, mashing them with the end of a two-by-four, and then pressing through a colander.
Basically, you’ve got some engineering problems ahead of you if you’re trying to pull juice from loquats, so I’d love to hear how you solve them!
How Much Sugar for Loquat Wine?
That’s a really good question. There may not be enough sugar in loquat juice normally to make a cider you want to drink. It’s worth a try, but I honestly haven’t even taken a specific gravity of raw loquat juice.
The cheapest and most effective sugar is regular old white baking sugar from your grocery store. When I first started home brewing, everyone thought that white sugar would cause a ‘corny’ taste, so you had to counter-logically use corn sugar instead. This turns out to be a myth. White sugar ferments off without taste, leaving behind only alcohol. The more you add, the heavier the wine, the less you add, the lighter the cider that you get. Rule of thumb is two pounds of sugar per gallon, and watch your hydrometer for a specific gravity matching your target. My last batch had a specific gravity of 1.065, which should give me a light table wine.
If you add more sugar after the first fermentation stage is complete, a process called syruping, you can trick the yeast into creating a much higher alcohol level than a normal wine, which is what usually makes a sherry heavier than a normal wine.
My first batch of loquat wine I fortified with honey, essentially making a loquat mead. Unlike white sugar, honey definitely ferments off leaving a taste behind, a taste which I’ve come to realize I don’t particularly care for. Also, honey is a lot more expensive than white sugar, so I don’t see myself making loquat mead any time soon, but it’s there if you want it.
Sterilizing the Juice
This is a step very familiar to home brewers. If you let nature take its course, any fruit juice will ferment due to the germs which are everywhere in the real world. The problem is that most of those germs will make a gross-tasting wine. Preferably only the scientifically husbanded yeast strain you buy in the brew shop will do the fermentation.
There are three generally accepted techniques for controlling the fermentation of wines and ciders:
- Use sulfates to kill everything in the juice. Usually these are campden tablets, available from any brew shop. After a few days, the must is sterile and the sulfates have evaporated and you can add your own yeast. The disadvantage of this is it adds chemicals to the finished product which may cause headaches depending on dosage and susceptibility. If you’ve had a bad hangover from cheap wine, sulfates may have had a hand in that.
- Pasteurize the juice by heating. They say this causes the finished product to lose a “bright” flavor or develop a cooked-fruit taste. I’ve found in practice that most people haven’t had loquat wine before, so they don’t know the difference, if there actually is one. And if you add enough sugar, your tasters will quickly become too drunk to complain. Most resources online say to heat it up to 160F or 180F for several minutes. I’ve used 140F and then crashed the temperature with a wort cooler coil and not had any problems.
- Give it a hefty dose of yeast. The loquats are going to be pretty acidic right off the bat, which is bad for bacteria, so if you turbo-charge your yeast before adding it to the must, it will probably take over and out-compete any local germs before they can get a foothold. If you’re wrong about that, and some gross-tasting strain of bacteria or mold gets into the juice, you’ve just ruined hours of work and your only chance to make loquat wine until next year at least.
- Don’t do anything. This is not a generally accepted way of doing it, however it’s how wine and booze has been made for thousands of years. I’ve not tried it with loquats, but I have with wild grapes. If you mash up the fruit and leave it in a bucket, nature takes its course. The batch of mustang grape wine I made that way came out distinctly vinegary, but diluted with Big Swig sparkling water it was drinkable and had enough of a kick to make it worthwhile.
Fermenting Your Loquat Wine
If you’re a home brewer, you already have some carboys and air locks on hand. If you’re not a home brewer you might be able to rig something with materials on hand. You basically want a pretty clean container that you can seal, with a device for allowing escaping carbon dioxide to go out, without outside air coming back in. Recently I went into my local home brew shop and asked for a ‘yeast lock’ and the clerk laughed at me, although to his credit he tried to walk back his first reaction.
I think you should buy a glass carboy for this, but in the past I’ve used food grade plastic buckets. When I worked at a bakery the cherry filling would come in five gallon plastic buckets. After scooping it all out into pies and pastries and whatnot, I could drill a hole in the lid and put one end of a vinyl tube through the hole and the other end in a glass of vodka. The plastic buckets are hard to keep clean, they break easily, and they never seem to hold a good seal, but you can use it until you get tired of all the extra work. Don’t use the Home Depot buckets, they aren’t food-grade, they’ll make your loquat wine taste like a Home Depot paint and adhesives section.

So add the yeast to the juice, and it should start fermenting visibly within twelve hours or so. They say the type of yeast you use will affect the final taste more than anything else. I haven’t done this often enough to give advice on that end, but keep records of which yeast you use and the final results until you find something you like.
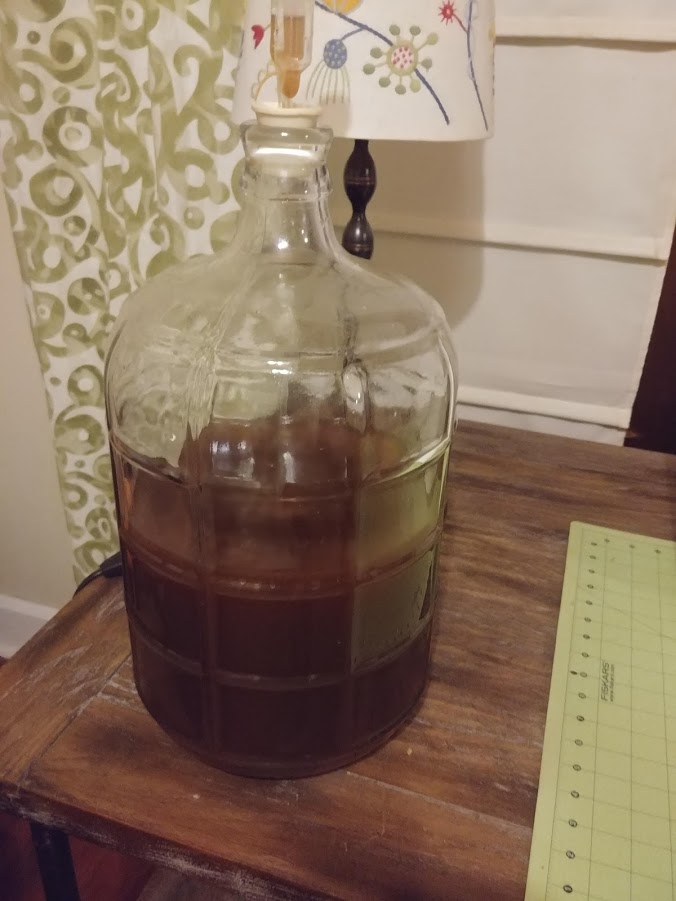
After the bubbling out the airlock slows, rack the wine into the second stage carboy (a process done with a fairly inexpensive kit of tubes available at a brew shop). In this stage you want two things to happen. You want all fermentation to reach its conclusion (or your bottles will explode), and you want the wine to clarify. Both these processes can take some time. It’s fun to watch the clarification line fall down the side of the carboy over the course of weeks, like a dust storm taking forever to settle over a desert valley.
Bottling Loquat Wine
There are a lot of options for bottling once the second stage of fermentation is complete. I happen to have about two hundred beer bottles I got for free off Craigslist, so all my home brewing is centered on getting that used up. You can use empty wine bottles, which you can cork using a fairly inexpensive device from a local home brew shop. I’ve used a hammer to drive corks into wine bottles, back in the day when I was even cheaper than I am now, and I would not recommend it. Not only does it not work very well, but there’s a high likelihood of shattering the bottles.
If you are shooting for a cider or a champagne-style wine, you can add priming sugar at this time. I’ve been just adding a teaspoon of white sugar to each of the beer bottles. Then it’ll take a few weeks or a few months for the wine to condition. This is one reason I use beer-bottles for this, so I can sample from time to time to see how it’s coming along, which of course is a huge sacrifice for me to make.
Drinking Your Loquat Wine
Drink this with friends, dude! Or better yet, drink it with your friends at Loquat Fest!
Let us know if you tried this and any insights you earned. We do approve the comments you make below!
I love your step buy step instructions and comments. Im not sure I read how long to wait before drinking. Can the Loquat be fermented with the seeds?
Ann, the short answer for how long it takes is to wait for bubbling to stop coming out of the airlock. And this means, basically a stop. There’s going to be a period of weeks where it the bubbles will take a minute and a half for each burble, and that means it needs more time in the carboy. I think the last time I did this, it was two weeks in the first carboy, and then two months in the second carboy. And then another couple of months in the bottle before trying it out. It’s definitely a long-term project. For a beer-strength drink, the whole process could be as short as four weeks. The main danger is bottling the wine before the yeast has eaten up all the available sugars. If you do that, you’re likely to get an explosion, and I do mean explosion. I had a batch of ginger beer blow up once and it blew open the door of the closet it was in and left glass shards embedded in the wood and paint.
And don’t ferment with the loquat seeds. They have cyanides in it, which will surely leech out and cause problems.
If you try it I’d like to know how it turns out!
Thank You so much for your knowledge & insights on Brewing LOQUAT Wine. Wish me Luck.
I too have had an Explosion. We got lucky! It was extremely powerful. Glass shards shot everywhere even into the ceiling! My daughter and I had just walked past that bottle it was about 8 seconds later & it went off! Lucky.
Truthfully and sincerely Rebecca
Do the seeds cause any problems going through the fruit crusher?
Yes. You’ll have to turn the crank carefully so you don’t break any teeth on the crushers.